Table Selection
By default all available tables from the source and target databases that have matching names and a primary key will be automatically added to a data compare project if the tables are not selected when the project is first created. This state will continue until you choose Table Selection.
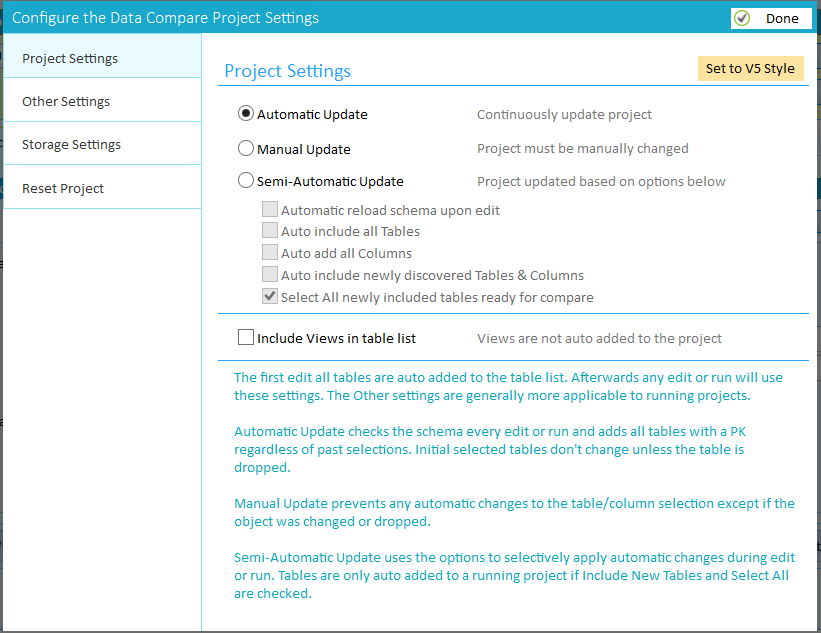
The first time Table Selection is chosen the project settings dialog is shown so you can configure how the project will manage ongoing table selection. Initially the project is in Automatic update mode.
Settings

When the data compare project runs the target schema is analyzed to ensure the selected tables and columns still exist, removing any missing tables or column from the compare. If you never select tables the project automatically matches the source and target tables and data compares the available tables. This is equivalent to Automatic Update mode.
Automatic Update Mode
Whenever the data compare project runs any new tables that have matching table name and a primary key are added to the project along with matching columns and compared along with any previously defined tables. Where possible automatic mode doesn't overwrite the original project settings so filters and column selections and conversions remain.
When editing the project and choosing Table Selection the source/target schema are re-loaded, new tables automatically added and selected ready for compare. Removing a table from compare in Automatic Update mode has no effect since this table will be re-added when the project runs.
Manual Update Mode
This option allows you to configure your project ensuring that SQL Delta does not change the settings, unless a table or column is removed. Initially the tables with a primary key are shown in the table list however they are not selected.
Semi-Automatic Update Mode
The 5 check box options provide a degree of automation to an otherwise manual update mode.
Once a project is saved the existing tables and columns are set and unless the underlying schema changes and those objects are deleted from the schema.
See Settings for more information about configuring other elements of the project settings.
Table Selection
A list of past selected tables or views is shown indicating the items to compare. When a project is saved only the selected compare objects are saved and the unselected objects are discarded.

Select Tables
Initially all the tables that have a common schema/name are shown in the table list. Depending on project settings this list may be reduced to a subset table list of selected tables. Click Select Tables to display a full list of tables and choose the tables to include or exclude from the project. Additionally tables can be mapped within Select Tables.
See Select Tables for details on the table select and mapping process.
Configure Columns
Select a specific table and configure and map the columns within the table. Either click the column cell icon or the Configure Columns button.
See Configure Columns for details on how to configure columns and column mapping.
Select Index
The data compare requires a unique sort and compare column or set of columns to perform the initial data compare. This unique value determines the columns that exist only in source or only in target.
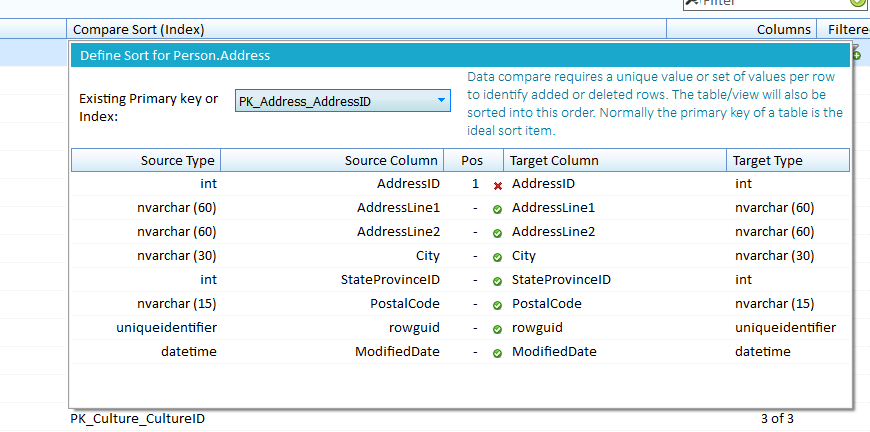
Initially the Primary key is selected as the Selected Index/Compare sort. The drop down box displaying PK_Address_AddressID shown below will also display any other indexes that might be available. Using an index for sorting with improve the performance of the data compare process. To modify the sort click the Compare Sort(Index) cell icon or Select Index button.
Custom Sort
Click the Pos column to select a new compare column and to add more columns just click the Pos column. The number indicates the ordinal position of the column in the process. To clear the column click the X (click the Pos column again).
Some columns may not be selectable because they cannot be used in a sort. When a user defined sort is created the primary key index value changes to Custom Sort. To revert back to using the primary key just click the primary key drop down and choose the desired index.
Once you have configured your settings click away from the Define Sort box and the changes will be automatically stored.

Set Filters
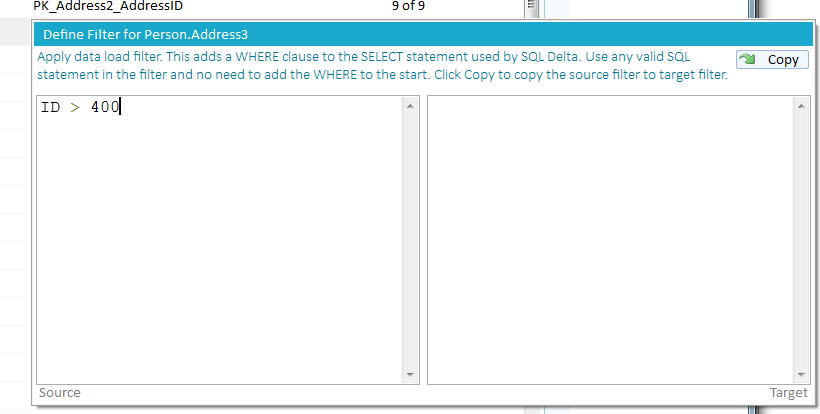
 Filters can be applied to the source, target or both tables during the data load process. The filter is simply a where clause that is added to the data is loaded and can use any valid SQL statement, function or operator for the selected table. Please note that SQL Delta does not validate the filter and any syntax errors will cause the compare of that table to fail.
Use the Copy button to copy the source filter into the target filter. The WHERE reserved word is not required and will be removed from the filter.
Remote Networks
Data compare may transfer a large volume of data across your network if you are comparing data on a server or servers remote from SQL Delta. Sometimes the volume of data may be too large and timeouts occur and filters can be used to restrict the data load. For example two projects could be created comparing the same tables and each project uses filters to read a subset of data. While this is a work around and some care taken to ensure all data is loaded this can solve timeout problems.

Reload Schema
Force a reloading of the source and target schema.
When editing a project, depending on the settings, the schema data is not automatically loaded, instead the previously selected tables are displayed. By not reloading the schema the table list display if much faster, handy if you are simply reviewing the previously selected tables. If any action is taken that requires an up to date schema such as Selected Tables then the schema is automatically loaded from source and target. See Automatic Update or Automatic Reload in Settings for information about forcing the schema to be reloaded every edit.
 Check/Uncheck All Tables
Only checked tables will be compared and clicking the tick check box selects all available tables. Tables without a sort will not be checked. After applying a filter only the visible tables will be checked or unchecked when applying the check/uncheck All.
Display Filter
The table display can be filtered by table name by entering text in to filter box and pressing enter (or clicking the tick) and this can be canceled by clicking the X.
 The data schema filter displays a list of available schema for the tables and unchecking a schema will filter all tables within that schema.
The Check All/Uncheck All buttons will only check the visible tables (that have a primary key defined).
