Database Selection
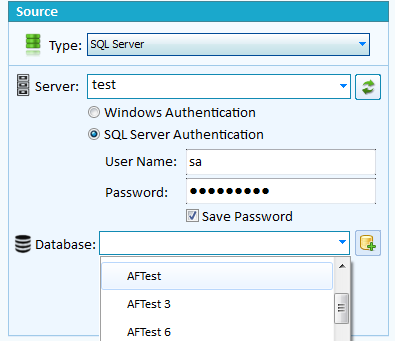
SQL Server Connection
Server : The server name or IP address. This uses the same formatting as most application database connections strings.
Port : By adding ,Port to the server you can specify a non standard port for SQL Server. E.g. 10.0.0.10,1435 where the server is listening on port 1435 instead of the default.
Authentication: Windows Authentication uses your Windows login details.
SQL Server Authentication requires a user name and password for the connection. Also ensure the server was configured with Mixed mode authentication.
Save: Check Save password to keep the password, if left unchecked you will be required to re-enter the password every time you run the project.
Passwords as saved in a reversible encrypted format however we strongly recommend you consider security implications when choosing this option.
If your user password is blank then check save password.
Database: Once the above details have been entered a database can be selected from a retrieved list of databases.
 Create a Database
Once you have configured the Server and Authentication there is an option to create a new database on the server. Of course your authentication will require sufficient rights to create a new database and some default settings will be used.
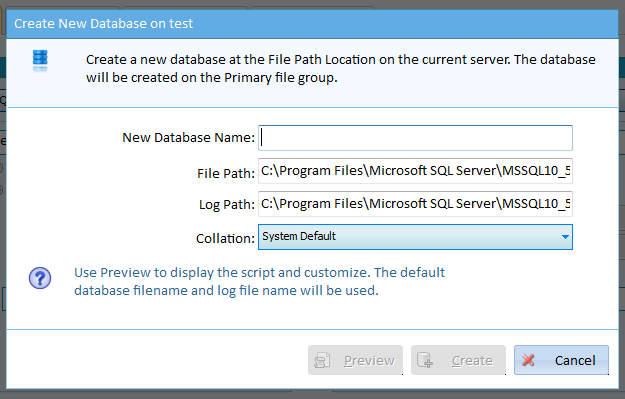
Enter the new database name and click either Create or Preview. The preview option will generate a script window so you can configure other settings for the new database based on the Create Database Statement. If you click Create the script process will run in the background and a message will appear once the database has been created. You must then select the new database from the database list.
Snapshot
By changing the connection type to Snapshot SQL Delta can compare a snapshot to a live database or even to another snapshot.

Enter the snapshot filename of click the browse button to locate the snapshot. If entering a filename click Refresh when done to load and validate the snapshot.
Once the snapshot has been loaded the details of the database and server will be shown.
Server List
Each time a new server/database connection is made the server and database is added to the drop down server list. Clicking the star will toggle setting the server as a favorite and when favorite is set the server name moves to the top of the list. Clicking the cross will delete the server and any associated databases. The arrow to the left of the server name expands to show the various databases that have been previously used. Clicking the cross in the database list removes the database from the list.
Selecting a server or database from the drop down server list will automatically populate the connection fields based on the last saved information.
The Refresh button next to the server list starts a background search for existing SQL Servers within your local network and adds the newly discovered servers to the server list when finished. The detection process does not discover all servers and does not detect the server port. Since the detection process runs in the background the updates are silently added at the end of the search. The process can take a few minutes or longer depending on the network.
The server list is a global list and is automatically saved at various times during a session.
